Have you been searching for a flowering vine that is both charming and easy to take care of? Well, then your search ends here because the Black-Eyed Susan vine (Thunbergia alata) is the perfect option for you. This native eastern African plant can be seen at various garden center’s hanging in baskets and is the ideal plant to be grown in tropical climates.
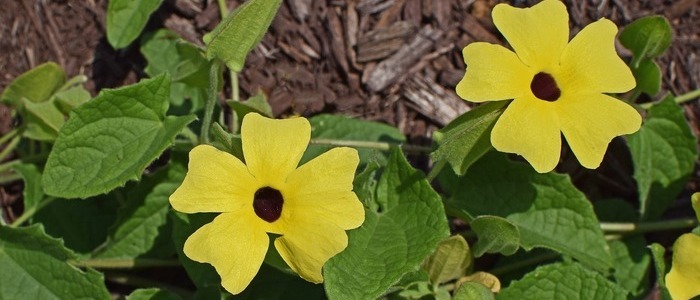
The flowers of the Black-Eyed Susan vine have a brownish-purple tube in the centre and look like daisies from a distance. The five solid-colored petals overlap each other, and the leaves are a bit coarse and grow opposite to each other. Also, the flowers can be red, white, yellow, or orange colored. Well, now that you know a little about the plant in this article, we are going to talk about how to take care, grow and prune the black-eyed Susan vines.
Black-Eyed Susan Frequently Asked Questions
Can black-eyed Susan be grown in pots?
The Black Eyed Susan vine can be grown in pots and containers. Ideally, the plant should be grown in large pots with a minimum size of at least 1 gallon, and placed in a location near a metal fence or lattice because these plants can tangle themselves easily around any support.
How to care for the black-eyed Susan vine?
When caring for the Black-eyed Susan vine remember it is better to provide a proper vertical structure, to begin with for these plants instead of disrupting them later. Make sure to plant them near any pole, fence, or cage where these vines can climb easily.
Black Eyed Susan Vine Plant Care Tips
Black Eyed Susan vines are quick to grow and have a sprawling nature. Because of this, they can easily overtake any nearby plants and need to be grown solo. Also, these plants can tangle themselves easily around any support. Therefore, it is better to grow these vines near a metal fence or lattice. The flowers keep blooming from summer to fall. Below are mentioned some points which should be kept in mind when growing the black-eyed Susan vines.
- This plant grows well in soil that has high organic matter and neutral pH. You can also add some compost before planting this vine.
. - Try growing these plants when the sun is full so that the vines can get direct sunlight for at least six hours. But if you live in an extremely dry and hot climate, then grow it in partial shade.
- The Black-Eyed Susan vine needs light feeding of complete fertilizer every couple of weeks (around four to six). While plants that are grown in containers need to be fed more frequently (around two to three weeks).
- Make sure that the soil is moderately moist, not soggy or dry, and parched. You can also try mulching around the plant’s base to make sure the roots remain moist and cool.
- Black-eyed Susan vines are considered perennial plants. This means you can easily transfer them indoors in the winter and they will still bloom provided they get enough sunlight, and the temperature doesn’t fall too low.
- Humidity isn’t really a big deal for these plants but make sure that the soil is moist as they struggle to thrive in extremely dry conditions.
Tips for Growing the Black-Eyed Susan Vines
To grow this plant, all you need to do is sow some seeds directly in the soil. Just make sure the soil is at the right temperature (minimum 60 degrees Fahrenheit). If you are living in a cold climate, go for nursery transplants, or you can even start these vines indoors.
It’s better to provide a proper vertical structure, to begin with for these plants instead of disrupting them later. Make sure to plant them near any pole, fence, or cage where these vines can climb easily. The Black-Eyed Susan vine doesn’t face any disease or insect problems when planted outdoors, but you might face some problems with whiteflies and spider mites if grown indoors. In case of any insect problem, use some horticultural soap and neem oil to fix the issue.
Keep in mind the following things when planting a Black-Eyed Susan vine:
- The Black-Eyed Susan vines need well-drained, fertile, and rich soil that has good water-retention properties. Remember, the pH of the soil should be as close as possible to neutral.
- These plants need full sun or partial shade. In case you live in a place where the heat intensity is high, growing these vines in partial shade is a better idea.
- Watering deeply and regularly is necessary for the Black-Eyed Susan vines. The soil should be moist instead of wet so that the leaves don’t wilt. Keep in mind that you should never let the soil completely dry out, especially if you are growing these plants in pots.
- These vines prefer a warm and humid climate. This is why the Black-Eyed Susan vines are more popular in tropical areas. But you can grow it anywhere you want, providing you water them regularly. The flowers tend to bloom the best after the hot summer.
- These plants need to be fed after every two or three weeks when they are in full bloom. Try using a fertilizer that is half-strength and designed to boost the plant’s blooming.
Pruning the Black-Eyed Susan Vine
Pruning is a necessary part when it comes to taking care of the plant. Remember, timely and proper pruning will keep the plant robust and healthy. Not to mention it will also promote new growth. Pruning doesn’t take much time either and is easy to do too.
Now, have some of the flowers of your Black-Eyed Susan vines slightly wilted or faded after they have blossomed? If the answer is yes, then it’s time to deadhead these flowers. Now, what is deadheading, you ask? Well, simply put, deadheading is the practice of cutting or clipping a flower that is decaying. Just make sure you clip them at the base and then pinch it off using your fingers. Now, if you are wondering, how does this help? Well, this allows new flowers to bloom where once the old ones were blooming.
In case you are looking for a bushier and shorter growth of the Black-Eyed Susan vine, then just cut them after they have grown more than 12 inches. But make sure you do this right in the middle of the Black-Eyed Susan’s growing season. This encourages the plants to grow bushier, and the vine will produce more flowers.
Pruning these vines for the winter isn’t an absolute necessity. But if you want to make your spring work easy, just cut the plant’s stem almost to the ground. This way, when spring arrives, this plant will be able to regenerate itself from the ground up.
Yellow Houseplants Other Than Black-Eyed Susan


